Monday, June 18, 2012

laundry.craft room


My laundry room started out as nothing special.
 6' x 10' ... Enough room for a future washer and dryer, and random storage sitting on top of builder-standard linoleum.
 Don't forget the lovely MDF shelf. That's a standard feature, too.
 We started the sprucing up by painting it Behr Spa. Ahhh.

Brent installed the washer and dryer, we used the built-in shelf for detergent and other keep-out-of-reach cleaners ...
  and I stored some craft boxes on a tiered shelf and spare cabinet (picture taken pre-paint). Nice.

For a few months we just let the room sit. But we knew the room had way more potential, despite its small size. We tossed around the idea of cabinets and a countertop to utilize wall space and high ceilings. We priced out configurations through cabinet companies but weren't sold on their products or prices. Brent was a stud and researched cabinet options for me at local stores and online. After much consideration and planning, I chose my cabinets and he ordered them online -- saving us lots of cash!
 The cabinets shipped a few weeks later and Brent went straight to work. The uppers went up in a jiffy since they were delivered pre-assembled. Brent is pretty handy with a ledger board and drill. 
 Oh yeah, we also said goodbye to the ugly linoleum. By shopping around we bought this 10x20 gray linen tile for $2.89 sq ft, which was a dollar cheaper per sq ft compared to other stores -- which adds up! Since Brent was juggling several other projects, we had a guy install it for us in the bathrooms and laundry room.
 Once the uppers were in, the base cabinets came next.
 Lookin good, eh? These are Cardell Classic II Flat Panel Maple cabinets in white with pewter glaze. I absolutely love how they have the look of antiqued white cabinets, yet with a modern twist using flat panels and pewter glaze accenting. It fits right in with our modern style.
Then the countertops arrived! This is Silestone (quartz) Stellar Snow. It literally sparkles. Because the amount of quartz we needed was less than an entire slab, we ordered it through Home Depot, who charges by sq ft instead of making you buy an entire slab -- saving more cash!

The guys who installed our baseboards downstairs (a few months back) returned to outfit the upstairs, too. 
So we turned this ...
into ...
 The finished product! Three drawers on the left base cabinets, three big base cabinets on the right. Nine upper cabinets. Space for me to sit and do crafts. And still enough room for the washer and dryer. All within 6' x 10'.
I am beyond thrilled to have my own little mom cave.

Maybe I'll even add a chandelier.

Sunday, June 10, 2012

evolution of a pool, pt. 1

If you've ever wondered how a pool is built ...
This is the our landscaper's design, as if viewed from our house looking out. 
And a bird's eye view. We're working with Green Planet Landscaping, who subs out the pool itself to Laguna Pool & Spa.

And here's how it's done.
 04.10.12  Measuring and spraying the form.
Digging the hole. Since we have a wide side fence, they knocked it down and brought in the big guns.
04.11.12  After digging less than two feet down, they ran into caliche: (wiki) a hardened deposit of calcium carbonate, which cements together other materials, including gravel, sand, clay, and silt.
Which means they had to bust out the jackhammer at an hourly rate. Awesome.
 04.17.12  The pool is finally carved out.
 04.29.12  Plumbing and gas lines set, after several days of placement. The gas line runs to our gas meter on one side of the house, and the plumbing runs to the other side of the house to our pool equipment.
 05.04.12  Rebar placed over a few days. Electrical hookups also added.
 05.11.12  Cement sprayed, aka. shotcrete.
Later that day, the pool has form. 
 Over the next several days, the concrete will set.
 And so I tried out the hot tub.
 05.23.12  Forms for the decking placed (at first in the wrong spots, so they reset them this day). Also, previously the retaining wall in the background was dug out and started to be formed.
 And tiling continues (started earlier that week).
 Closeup.
 05.25.12  Glass tile starts.
Closeup.
 05.31.12  Grout started, worked on next day
 More tiling completed.
06.06.12  Hot tub tiling started, worked on again 06.09.12. Retaining wall finished as well.

And that brings us to today, two months since we broke ground. 
Still needing to be completed: tiling finished, decking poured, fire bowls installed, gas and electrical hookups finished, plaster poured, inspection passed, landscaping installed ...

Someday my pool will come.

Wednesday, April 18, 2012

bike wheel clock

Last fall while watching the pilot episode of the new Design on a Dime with Casey Noble on HGTV, I saw the designers create a clock out of a bike wheel. I thought it was so neat that I had to try it. 

Months later, after hours of fruitless searching for the episode online, or any other tutorials, I almost gave up.

But then I decided, why the heck not?

I set off to find a guinea pig wheel or bike. I struck out at several thrift stores. But then I was directed to Southwest Bikes and I tried my luck. After explaining my idea to them, I asked if they had any junk wheels I could buy. As fate would have it, they did!
Please forgive me for using a few stock photos.
Then I bought a clock kit from a craft store, similar to this one. I toyed around with the idea of buying a clock and taking it apart, but that sounded waaay out of my skill level. Or patience.

I took my treasures home and spent the next few days brainstorming and trying to disassemble the wheel. After several unsuccessful attempts, despite the youtube videos that said I could do it without special tools, I turned to professional help.

The awesome guys at Broken Spoke Bikes endured several visits from me (one where I accidentally left the bike wheel in the parking lot, they held it for me til I returned). They graciously took apart the bike cassette and sawed down the hub so the wheel could sit flush against the wall.

Then I was left with an empty skeleton of a bike wheel. I scrubbed it and the cassette parts with oven cleaner and steel wool til they shined.

I could finally begin turning it into a clock.

And since I was so wrapped up in the project, I failed to take tutorial pictures. But here's how I did it.

Total cost: Free wheel + $12 clock kit + free handy help + glue and paper on hand = $12 and DIY labor

- I dry fitted the clock parts with a few smaller sections (gears) from the bike cassette. According to my husband, some wheels' cassettes come completely apart, some are completely stuck together, and some come in several chunks. Note this when looking for a wheel. I lucked out. I sandwiched the gears in between the clock motor and the clock hands, making sure the hands had plenty of clearance to spin around. Measure twice, cut glue once, right? I carefully glued the gears to the front of the clock motor using E6000/super glue, waiting plenty of time for it to dry.

- I dry fitted the clock motor onto the middle of the wheel, looking underneath it to make sure where I would be gluing wouldn't keep me from changing the battery or changing the time on the back of the clock. I also decided I wanted the top or "12" on the clock to be where the reflector was, so I positioned the motor accordingly. Then I carefully glued the motor to the wheel.

- For the clock hands, I wanted something bigger and brighter than how the kit came. But I had to find something that wouldn't weigh down the hands or else they wouldn't function correctly. Cue scrapbook paper. Yep, I cut out four skinny rectangles, two of each size for hour/minute hands, and glued them together with the clock hands sandwiched in the middle on one end -- poking a big enough hole through the paper so the hand could attach to the clock motor. I decided to leave off the second hand. Seemed appropriate.
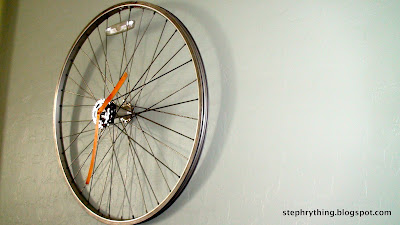
- I attached the clock hands to the motor, per the clock's instructions, and stepped back to look at my master{time}piece.
And then I gave it to my husband's boss, an avid cyclist.    Now I want one, too.

Tuesday, December 13, 2011

kitchen comes to an end

chapter 1
chapter 2  
chapter 3 

We finally tiled the backsplash. The kitchen is finished.

Before the move we scored this glass/marble tile for $6 a sheet at Bedrosians. We found it in the "seconds" section (normally goes for $15-20 a sheet), but despite some areas of inconsistency or discoloration, it looked pretty good.
We knew we wanted it in our kitchen so we bought five boxes. We had no idea what we were getting ourselves into.

11.04.11
Prep work. Brent and I taped paper over our countertops and filled in wall holes (from the old backsplash tear out) to make  it easier for the thin set and tile to adhere to the wall.
11.05.11
After watching lots of how-to videos online, we figured we could accomplish most of the project in one day. Hah. Snag after snag kept pushing back our start time. Wrong tile blade, electrical wiring in the way of the vent hood, no studs for the hood to be secured to, wrong grout, wrong size of screws, not enough wire, not enough caulk, needed more tools ...

I made two or three trips to home improvement stores. Brent cut a 1x2 ft hole in the wall, moved the electrical unit and wiring, and installed studs to support the range hood.
And we found the only store in Vegas open later than 5pm on a Saturday that carried a glass tile blade for a wet saw. Miracle.
We finally got started at 8:30pm that night.
Through trial and error, we learned the proper consistency for thin set, how to spread it on the wall, how to apply the tile and help it bond with the thin set, how to space sheets evenly with spacers ...
We finished this section at 11:15pm and went to bed.

We spent the next several days installing more tile.
11.10.11
We got to the other end of the wall and realized we needed to buy more tile (to finish where the hood would go).
Bought another box, installed it ...

11.15.11
Grouted the tile. What a mess.
We spent a few days caulking and sealing, Brent installed the vent hood, I painted most of what was left of the kitchen, Brent finished edging the paint, and now ...

the end.

epilogue: I may have been without a stove for two weeks with the rest of the kitchen as a construction zone, but it was worth it.
 

. stephrything . Copyright © 2011 -- Template created by O Pregador -- Powered by Blogger